
User Instructions
Everything Catalog Caddy does, in one place, written by the auctioneers who built it because cataloging by hand was costing us days we didn't have. This matches the built-in instructions inside the app (click the ? icon in the top toolbar), so it's here too for anyone comparing before buying, or who'd rather read it on the web.
Photography Tips
The quality of your photos is the single biggest factor in how good your titles and descriptions turn out. Image detection can only describe what it can actually see, so a few habits go a long way.
Photograph measurements
Include a close-up shot with a ruler or caliper reading somewhere in the lot's photo set. This lets the description mention accurate sizes and dimensions instead of leaving them out.
Capture detail shots
Close-ups of maker's marks, hallmarks, signatures, and other identifying details give it what it needs to write a more specific description. Without a clear photo of a mark, it will not guess at it, on purpose.
Keep the background clean
- Avoid other lots or clutter in frame, it can confuse which item the photo is actually of.
- Consistent, even lighting helps colors and materials read correctly.
- A few different angles per item (front, back, any damage) beats one photo from far away.
Clean up before you export
Ended up with a measurement close-up or lot-number sticker photo inside a lot by mistake? After running image detection, hover the photo inside the lot card and click the X to send it back to the pool. It won't affect the title or description already generated.
Any photo format works
Straight off an iPhone (HEIC), a flatbed scanner (TIFF), or a regular camera (JPEG, PNG), upload whatever your equipment actually produces. Catalog Caddy converts anything it needs to automatically, there's no separate step to re-export your photos into a different format first.
Image Pool
The Image Pool (left side of the main screen) is where newly uploaded photos land before they're grouped into lots.
Uploading photos
Click Bulk Upload Images in the top toolbar, or click anywhere in the empty pool itself before you've uploaded anything, either opens the same file picker. Select as many photos as you want at once. Large batches process in the background with a progress counter, files that are exact duplicates (same name and size) of something already uploaded are skipped automatically.
Grouping photos into a lot
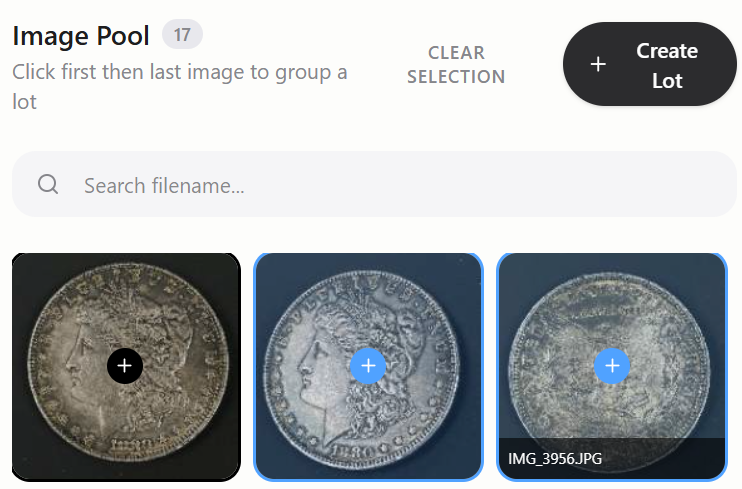
- Click the first photo of a lot, then click the last photo of that lot. Everything between them becomes one lot, ordered starting from whichever photo you clicked first through to whichever you clicked second, even if that means going backward through the pool. As you hover toward the second photo, every photo in between highlights so you can see exactly what you're about to group before you click.
- If a lot is only one photo, click it once, then click the Create Lot button that appears instead of clicking a second photo.
- Click Clear Selection at any point to cancel and start over.
Auto-Group: grouping by a fixed count instead of clicking
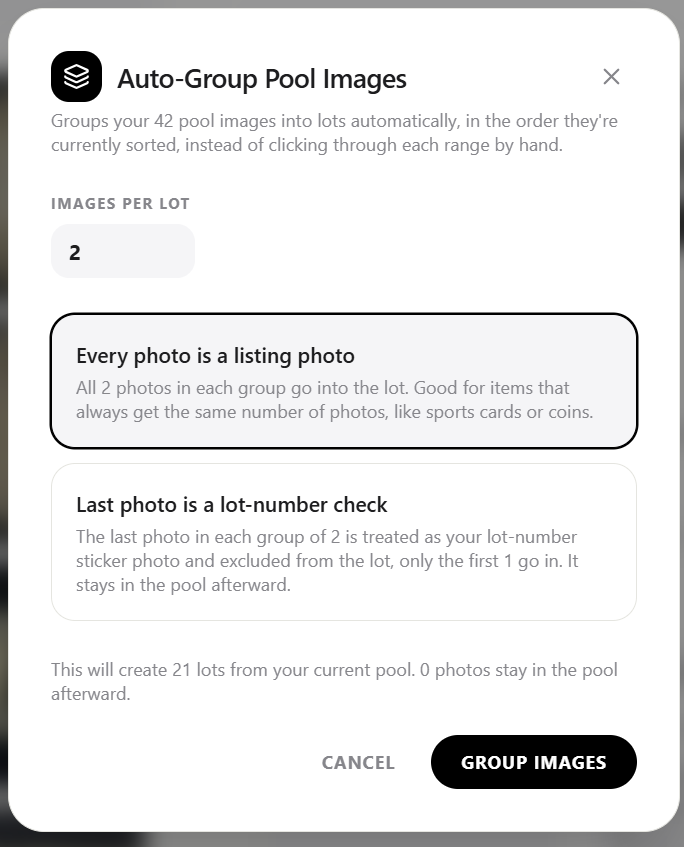
If every lot in a batch gets the same number of photos, sports cards or coins shot one-per-lot at a fixed count, click Auto-Group instead of clicking through each range by hand. Set Images Per Lot, then choose whether every photo is a listing photo (all of them go into the lot) or the last photo is a lot-number check (excluded from the lot and left behind in the pool, same convention as the sticker-photo tip above). A live preview shows exactly how many lots it'll create and how many photos will be left over before you commit.
Searching
Use the search box above the pool to filter by filename, useful for large batches where you want to jump to a specific photo instead of scrolling.
Photos that come back to the pool
Removing a photo from a lot (the X on its thumbnail) or deleting a whole lot returns those photos to the pool rather than deleting them, nothing is lost by mistake.
Auto-Detect Lot Numbers
A third way to group the pool into lots, alongside manual click-selection and Auto-Group: image detection reads the actual lot-number sticker in each photo and groups the pool into lots based on the real numbers it finds. Click Detect Lot Numbers next to Auto-Group in the Image Pool panel to run it.
What counts as a "sticker" photo
It's looking for a close-up shot where the printed sticker fills most of the frame, a finger, shadow, or blurry background in the shot is fine, but there shouldn't be any real item content in it. That framing is what tells it apart from an ordinary item photo. It reads only the printed number itself, any auction house name or logo also printed on the sticker is ignored, and leading zeros are stripped automatically ("0045" becomes "45").
Before you scan
A warning appears first: make sure every lot's sticker was actually photographed, and in the right order. A missed sticker or an out-of-order photo will throw off every lot number that comes after it, this automatic pass can't catch that the way grouping by hand naturally does. That same popup asks two things before it lets you start:
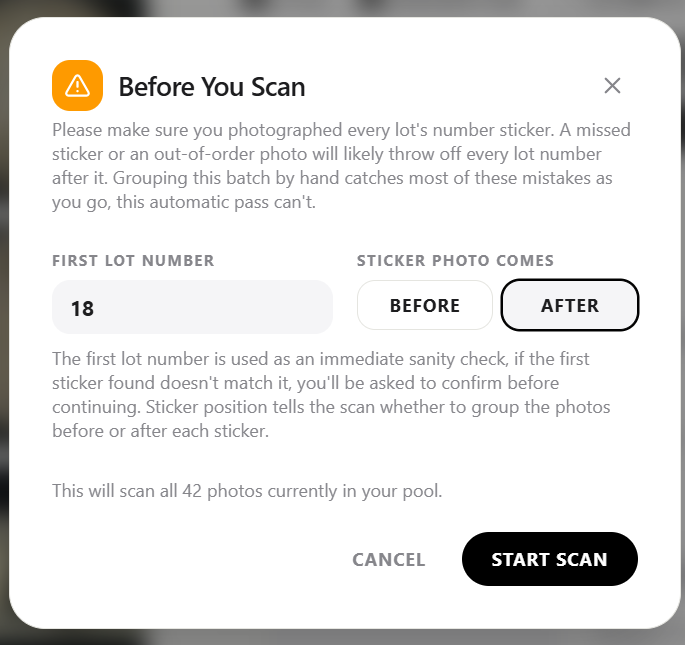
- First lot number, an immediate sanity check, if the very first sticker it finds doesn't match, you'll be asked to confirm right away instead of finding out only after the whole pool has been scanned.
- Sticker photo comes Before / After, whether your lot-number sticker photo comes before or after each lot's item photos, set it to match how you actually shoot. It defaults to "after," matching Auto-Group's existing "last photo is a lot-number check" convention, and remembers your last choice next time.
If the numbers don't add up
If a lot number skips ahead (say, jumping from 400 to 402), the scan pauses immediately and asks you to confirm before continuing, rather than plowing through the rest of the pool on a possibly bad assumption. Continue Anyway proceeds as read; Stop and Review leaves everything from that point on, including the questionable lot itself, untouched in the pool so you can sort it out by hand. This check can be turned off in Settings if you'd rather not be asked.
Sticker photos afterward
Same as manual grouping and Auto-Group's "last photo is a lot-number check" mode: sticker photos are never bundled into the lot they identify, they're left behind in the pool once the scan finishes.
Cataloged Lots
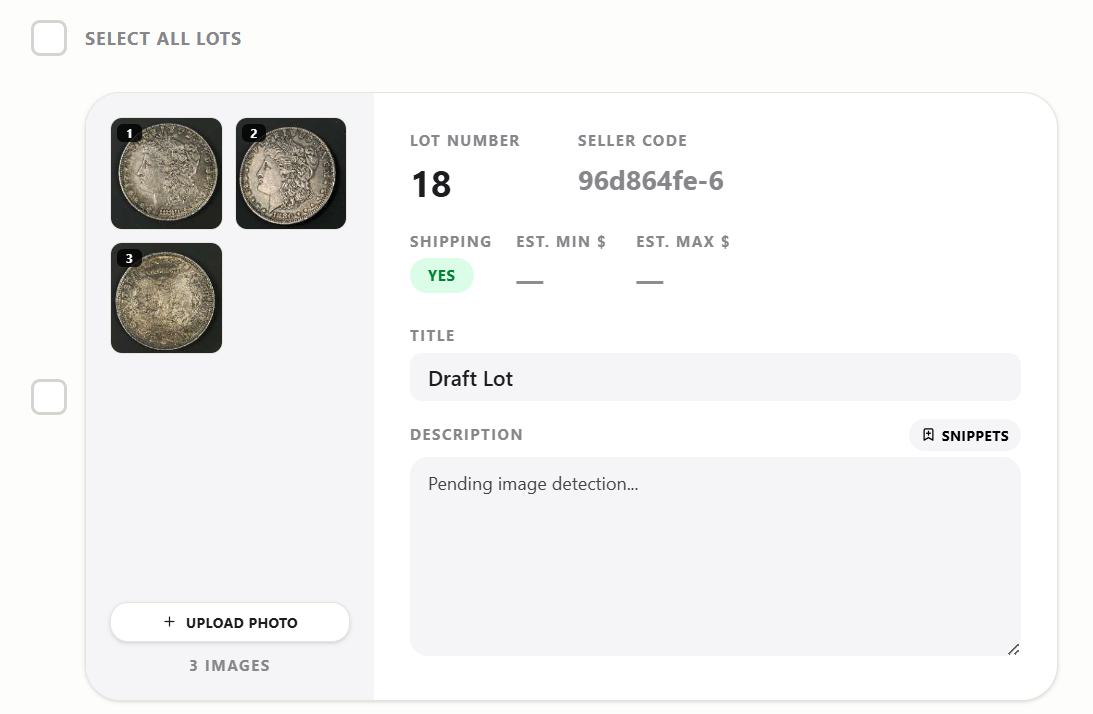
The Cataloged Lots panel (right side) shows one card per lot you've grouped. Each card holds everything about that lot in one place.
What's on a lot card
- Photo thumbnails on the left, numbered in order. Hover one and click the X to send it back to the pool without deleting the lot.
- Upload Photo adds a new photo straight into that lot, skipping the pool.
- Pull from Pool appears when you have one photo selected in the pool, click it to add the selected photos into this specific lot. Handy for a photo you missed during grouping.
- Lot Number, Seller Code, Shipping, Est. Min $, Est. Max $ fields, all editable directly on the card.
- Title and Description, generated by image detection or typed by hand.
Shipping availability
The Shipping toggle marks whether you're willing to ship this lot to an absentee or online bidder, as opposed to local pickup only. It defaults to Yes on every new lot, click it to switch to No for oversized, fragile, or pickup-only items. This maps directly to Auction Flex's Hibid Shipping Availability column.
Presale estimates
Est. Min $ and Est. Max $ set the presale estimate range shown to bidders, giving them a sense of what an item is likely to sell for before bidding opens. Image detection can suggest a starting range too, see the Estimates checkbox on the Description and Title tab.
Retrying or deleting a lot
Hover a card to reveal a sparkle icon (rerun image detection for just this lot) and a trash icon (delete the lot and return its photos to the pool).
Selecting lots for bulk editing
The small checkbox to the left of each card, outside its border, selects that lot for bulk editing (change Seller Code, Shipping, edit descriptions, or delete several lots at once). It's always visible, not just on hover. A Select All Lots checkbox above the whole list selects every lot in the batch in one click, for when you want to work across the entire batch instead of picking lots one by one.
Full-screen review
Hover a card and click the expand icon to open a near-fullscreen review mode for that lot: click through its photos one at a time like a photo viewer, with every field (Lot Number, Seller Code, Shipping, estimates, Title, Description) editable right below the enlarged image. From here you can also delete a photo (sends it back to the pool) or move it left/right to reorder it within the lot, using the small controls that appear over each thumbnail in the filmstrip. Press Escape or click the X to close.
Previous Lot / Next Lot, just below the photo, moves to the adjacent lot in your list without closing the review, handy for reviewing a whole batch back to back. This is separate from the arrows on the photo itself, which move between that one lot's own photos.
Cropping and rotating a photo
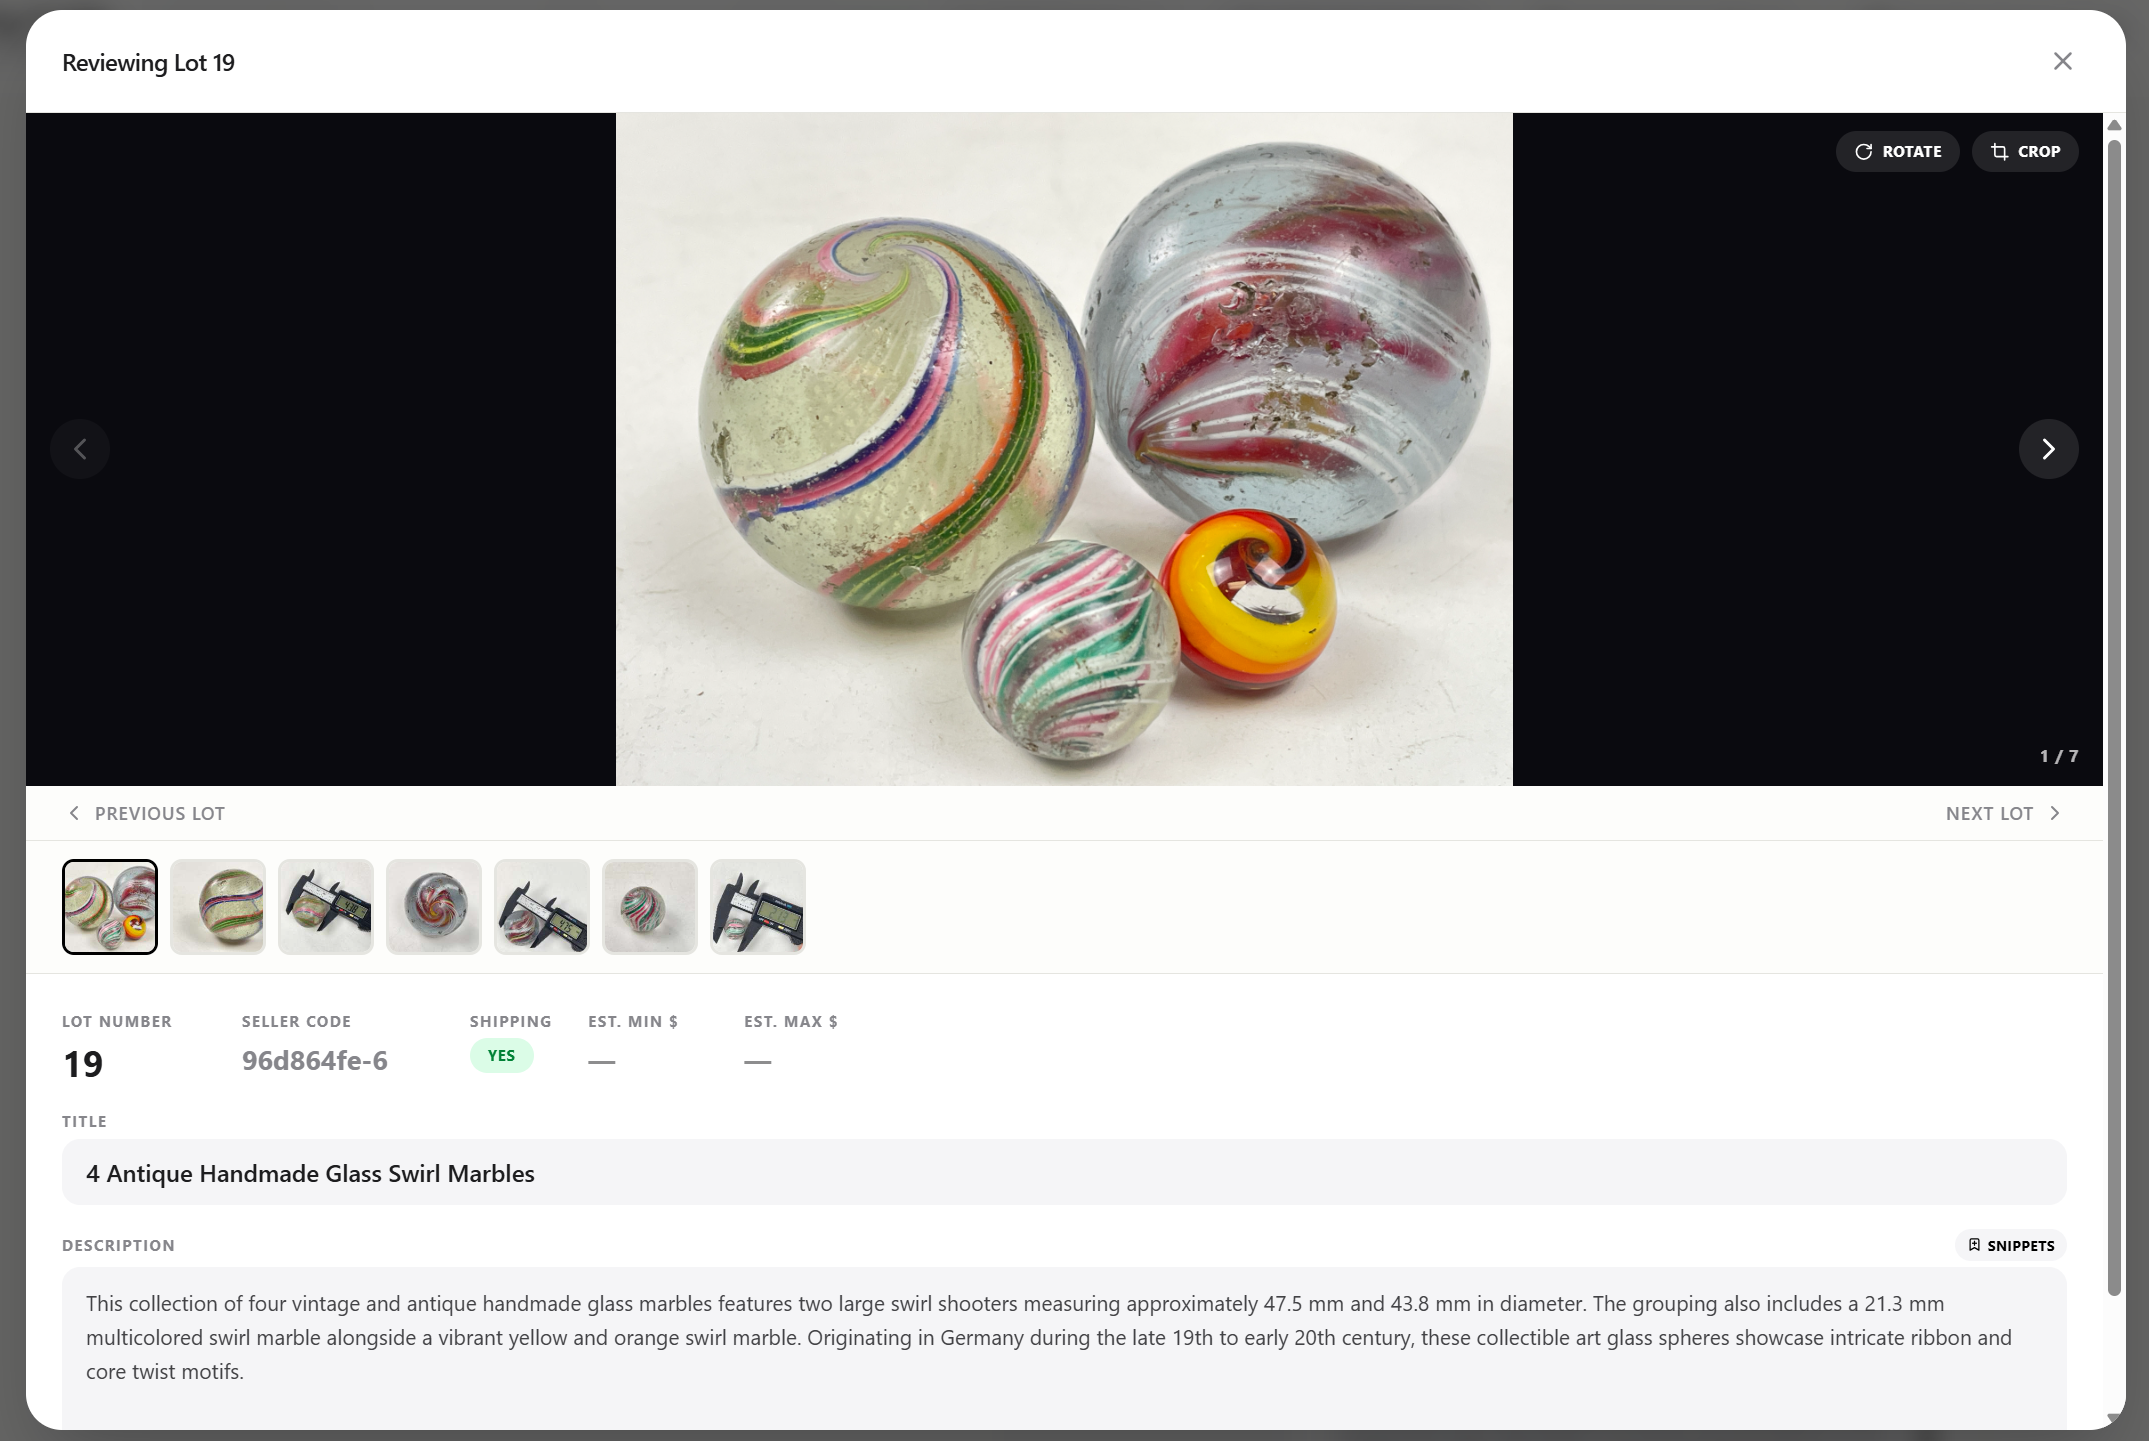
Inside full-screen review, click Crop on the enlarged photo, drag the corners or the box itself to select the area to keep, then click Apply Crop. Rotate turns the photo 90° clockwise with a single click, each click adds another quarter turn. Both happen entirely on your own computer, nothing is uploaded anywhere to do this.
Undoing a crop or rotate
An Undo button appears next to Rotate and Crop whenever the current photo has an edit to undo. Click it to step back one edit at a time, made three crops and a rotate in a row? Click Undo four times to walk all the way back to the original, untouched photo.
Saved snippets
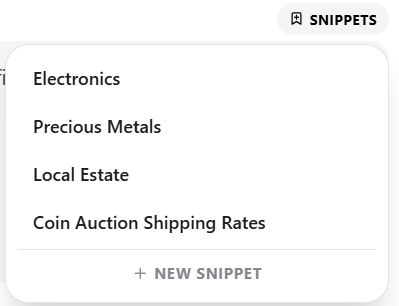
Click Snippets next to any description field, a lot card, full-screen review, or the bulk description editor below, to insert a saved phrase you use often: a standard shipping note, a recurring consignor disclaimer, whatever boilerplate you'd otherwise retype every time. Add a new one from that same menu, or delete one you no longer need with the trash icon next to it. Snippets are saved on this computer and available everywhere descriptions are edited.
Bulk editing descriptions
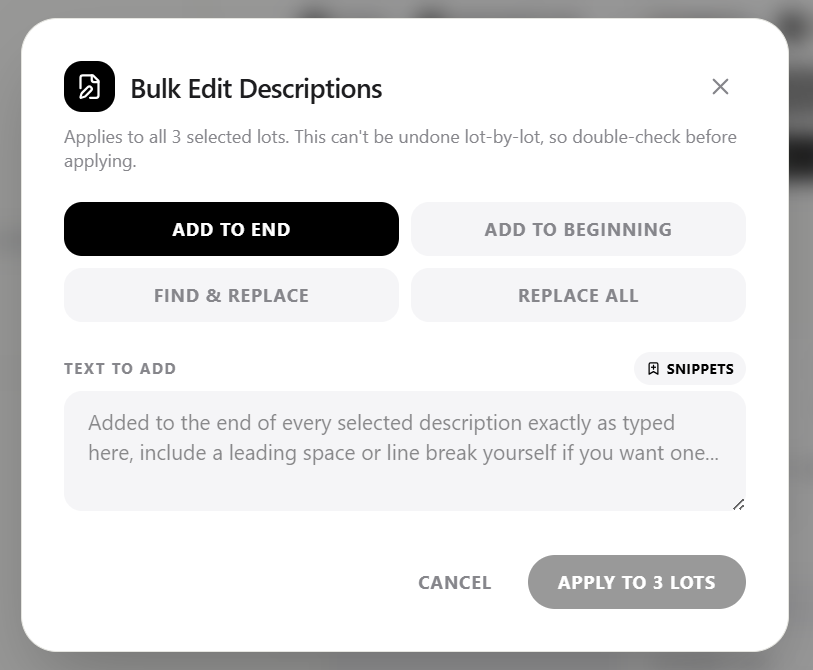
Click Edit Descriptions, in the "What Would You Like Generated Today?" panel, or in the bulk-edit bar once you've selected lots, to change many descriptions at once, eBay-style: add text to the end or beginning of every description, find and replace a recurring phrase, or replace the whole thing outright. Applies to whichever lots are checked, or every lot in the batch if nothing's checked.
Restricted item flag
A small warning icon appears on a lot card if its title or description mentions something that commonly needs special handling before listing, firearms, alcohol, protected wildlife materials, and similar categories. It's just a heads-up to double-check before you list, nothing is ever blocked or changed automatically. Turn it off in Settings if you'd rather not see it.
Autosave
Everything you do is saved automatically to your computer about 1.5 seconds after you stop typing or making changes, the "Saving... / Saved" indicator in the top right confirms it. Closing and reopening the app brings your batch back exactly where you left it, until you click Start New Batch.
Description and Title
Image detection technology looks at every photo in a lot together and writes a title, description, and optionally a presale estimate for it.
Choosing what to generate
The "What Would You Like Generated Today?" section (in the panel above the lot list) has a checkbox for each of Title, Description, and Estimates. Only checked fields get generated or overwritten, so if you've already typed a custom title by hand, uncheck Title before rerunning detection and it'll leave that field alone. Title and Description are checked by default, Estimates is off by default.
Don't use one of these often? Hide it entirely from Settings (gear icon) to clean up the panel, see the Settings tab. Hiding a checkbox always turns it off first, and showing it again never brings back whatever it was set to before, you'll need to check it again on purpose.
Running it
- Run Image Detection on All Drafts (in that same panel) processes every lot that hasn't been run yet, several lots at a time in parallel.
- The sparkle icon on an individual lot card reruns just that one lot, useful after adding a photo or fixing an error.
- The button is always there, but greys out if all three checkboxes are unchecked, or if there are no draft or errored lots left to process, nothing to do means nothing happens when you click it.
What it costs
Each lot costs exactly 1 credit, the first time either image detection or the image export touches it, whichever happens first, regardless of how many of the three fields you had checked. Running detection and then exporting the same lot (the normal workflow) is still only 1 credit, not 2.
Accuracy
It only describes what it can actually see in your photos. It's built to decline guessing things like maker's marks, model numbers, or materials that aren't clearly visible rather than making something up, better source photos produce better results (see Photography Tips). Coins and paper currency get extra caution: it won't state a mint mark, formal grade, or rare variety unless it's clearly visible in the photo, defaulting to the common variety instead of guessing. The one exception: a coin already in a certified grading holder (NGC, PCGS, ANACS, ICG, or similar) has its printed grade treated as a fact, like the date or mint mark, and always transcribed exactly as shown on the label, even with condition commentary turned off below.
Titles stay focused on the item itself, generic words like "United States" or a mint city are left out of the title and worked into the description instead, so the title stays short while the lot is still fully searchable.
Commenting on condition
Whether descriptions mention an item's visible physical condition (wear, scratches, missing pieces) at all is controlled by a checkbox in Settings, on by default. Turn it off for a batch where you're handling condition notes separately, and image detection will skip that commentary entirely rather than adding it anyway.
Notes for image detection
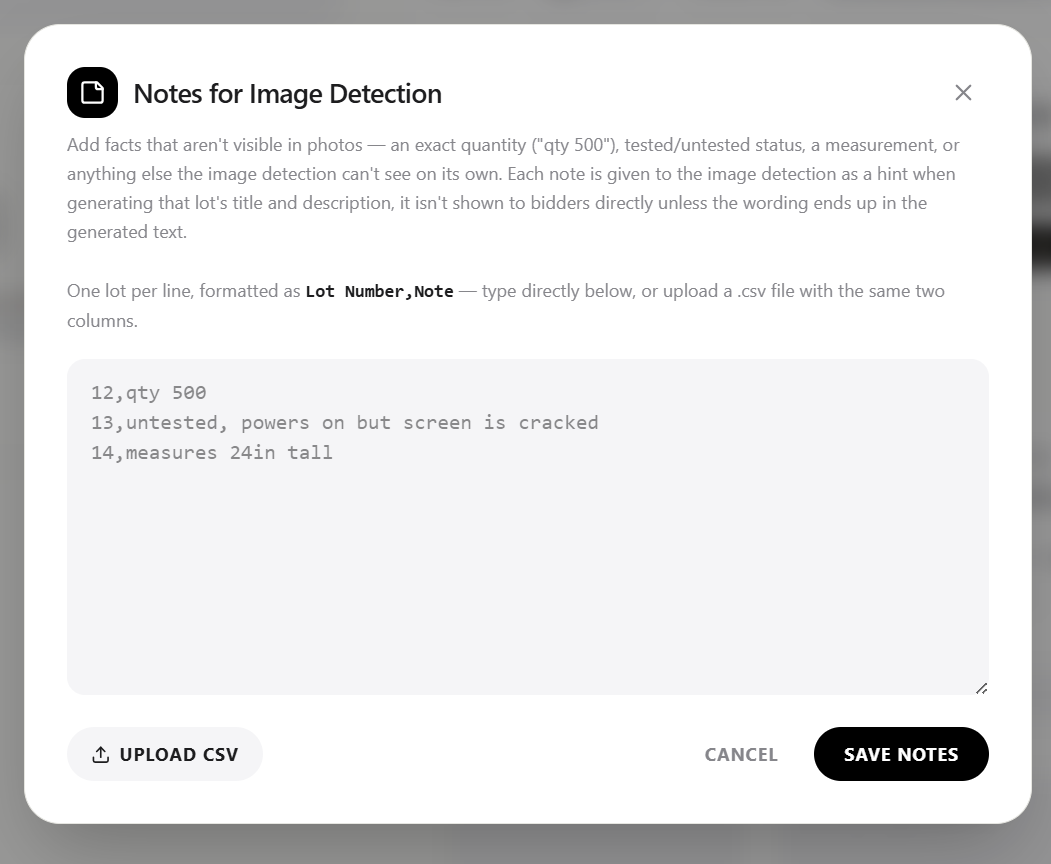
Some facts just aren't visible in a photo: an exact quantity, whether an electronic item was tested, a measurement. Rather than being guessed at (or, more likely, simply left out), give image detection that context yourself. Click Notes (next to Edit Descriptions) to open a simple two-column editor, one lot per line, formatted as Lot Number,Note, typed directly or uploaded as a .csv file. Whatever you write there is treated as ground truth the next time that lot's title or description is generated, the same way a corrected title is.
Estimates
When checked, image detection also suggests an Est. Min $ and Est. Max $ based on what's visible: materials, condition, legible maker's marks, and general knowledge of comparable items. It follows the same discipline as titles and descriptions, no invented rare or high-value identification without something visible to back it up. The suggested range is never too tight (aims for roughly double the low estimate rather than a narrow band) or too wide, and rounds to typical auction increments, $25 steps above about $100, smaller steps below that. This is a starting point for you to review and adjust, not an appraisal.
Editing
All of these fields are plain inputs you can edit any time, before or after running detection, whether or not image detection filled them in. Title is capped at 50 characters to match Auction Flex and HiBid's own limit, it's trimmed automatically if needed.
Correcting a title after the fact
If you fix something in the title after it was generated, for example correcting a mint mark or an item count, a Sync Description to Title button appears above the description. Click it and image detection rewrites the description to match your correction (using your edited title as the source of truth, not its own second guess), instead of leaving the description describing the old, wrong version. It disappears again once the description is back in sync. Since the lot has already spent its 1 credit, syncing the description doesn't cost anything extra.
Sync All Descriptions (in the "What Would You Like Generated Today?" panel, next to Run Image Detection) does the same thing across every lot at once, handy after a pass of correcting several titles in a row instead of clicking each lot's button individually. It's always there, but greys out when nothing needs syncing.
Seller Code
Seller Code identifies which consignor a lot belongs to, matching Auction Flex's own "Seller Code" import column. It's optional, leave it blank for lots where a seller code doesn't apply.
How it works
- The Seller Code field in the panel above your lots is the default, whatever you type there is automatically filled onto every new lot you create from that point forward.
- The checkbox next to it turns that auto-fill on or off. Uncheck it and new lots start with a blank seller code instead, even with something typed in the field, handy if you want to fill it in per-lot by hand for a stretch.
- Each lot's code can still be overridden individually right on its card, in case a batch mixes items from more than one consignor.
- It's saved on your computer between sessions, so you won't need to retype it every time you catalog for the same consignor.
Changing it mid-session
Each lot keeps whatever seller code it had at the moment you created it, it's not a live reference back to the toolbar field. That means if you're cataloging for more than one consignor in the same sitting, you can freely change the Seller Code field between batches of lots, already-created lots stay exactly as they were, only new lots pick up the new value.
Start Lot Number
Start Lot Number sets what number the next lot you create will begin at.
How it works
- Each new lot is numbered automatically: Start Lot Number plus however many lots already exist in the current batch. You don't have to number lots by hand.
- Any lot's number can still be edited afterward on its own card, useful for skipping a number or fixing a typo.
- It's saved on your computer, so if you always start at 1, that's what you'll see next time too. Remember to update it before a batch that shouldn't start at 1.
License Key
Your license key connects the app to your account: it's what tracks your credit balance and yearly access.
Setting it up
- Paste the key from your purchase confirmation email into the License Key field in the toolbar.
- The eye icon shows or hides the key, it's masked by default like a password field.
- Once a valid key is entered, a pill appears next to it showing your remaining credits. Hover it to see your yearly renewal date and credit expiration date.
Running low or expired
If you run out of credits or your yearly access lapses, cataloging pauses automatically and a banner appears with a "Buy more credits" or "Renew access" button, it opens your browser straight to the right purchase page.
Free trial
New yearly subscriptions start with a 3-day free trial, no card required, plus 25 bonus credits so there's actually something to test with. If you never add a payment method, the trial simply ends on its own and nothing gets charged.
Managing or canceling your subscription
Use the subscription management page to add a payment method, update billing details, or cancel yearly access at any time, look yourself up by the email you used at checkout.
Spreadsheet
Once your lots have titles, descriptions, and everything else filled in, you have two ways to get that data out of Catalog Caddy: copy and paste, or download a spreadsheet file. Both use the same column order Auction Flex expects: Lot Number, Title, Description, Seller Code, Hibid Shipping Availability, Presale Estimate Min Each, Presale Estimate Max Each.
Blank cells are fine
Not every column needs a value for every lot. Seller Code, Presale Estimate Min, and Presale Estimate Max are all optional, if a lot doesn't have a seller code or you don't want to publish an estimate, just leave that cell empty. Auction Flex accepts blank cells in these columns without issue.
Copy and paste
Copy for Spreadsheet (top toolbar) copies every lot, every column, ready to paste directly into a spreadsheet cell.
Download a spreadsheet file
Download Spreadsheet (top toolbar) saves your current batch as a real .csv file you can open directly, no copy-paste needed.
Editing after you copy or download
Once your data is in a spreadsheet, whether pasted in or downloaded as a file, it's just a normal spreadsheet. Feel free to edit it there before importing into Auction Flex: fill in a seller code you left blank, fix a typo in a title or description, or flip a lot's shipping availability from No to Yes. That's often faster than going back into Catalog Caddy, especially for a quick fix across many lots at once.
Opening it in Excel
- Downloaded file: double-click it, Excel opens .csv files natively.
- Copy and paste: open a blank workbook, click cell A1, and paste (Ctrl+V, or Cmd+V on Mac).
Opening it in Google Sheets
- Downloaded file: in Sheets, go to File > Import > Upload, and choose the file.
- Copy and paste: open a blank sheet, click cell A1, and paste (Ctrl+V, or Cmd+V on Mac).
Getting your images into Auction Flex
Check Rename Images in the "What Would You Like Generated Today?" panel above the lot list, then click Export Images (.zip) right next to it to download every photo renamed by lot and position (for example, the third photo of lot 12 becomes 12-3.jpg, the exact pattern Auction Flex expects). The Export button stays greyed out until Rename Images is checked. Unzip the download, then in Auction Flex 360 go to Pre Auction > Lot Images > Select Lot Images and choose the unzipped photos. Auction Flex reads the lot number out of each filename and attaches every photo to the right lot on its own, no manual matching required.
Getting your lot info into Auction Flex
Save your copied or downloaded data as a CSV matching the column order above, then in Auction Flex go to Pre Auction > Lots > Import Lots, click Auto-Map, and upload the file. Because the columns already match Auction Flex's own expected format, it maps everything automatically, no manual field matching needed.
Download a blank spreadsheet template matching this exact column order, useful if you want to build a sheet from scratch before generating any lots.
Settings
The gear icon in the top toolbar, next to the User Instructions icon, opens Settings. More settings will land here over time as the app grows.
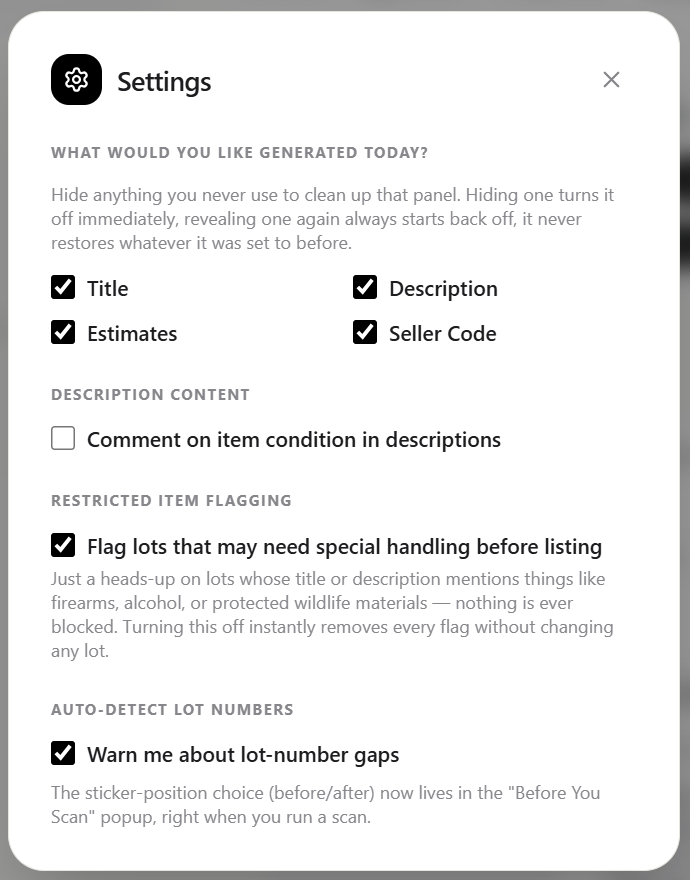
What Would You Like Generated Today?
Four checkboxes let you hide Title, Description, Estimates, and Seller Code from that panel individually, useful if you never touch one of them and want a cleaner panel. Hiding a checkbox always turns it off first, and revealing it again never restores whatever it was set to before, you'll always need to check it back on yourself. Title, Description, and Seller Code are visible from the start, Estimates starts hidden.
Description content
A checkbox controls whether descriptions comment on an item's visible physical condition at all, on by default. See the Description and Title tab for what this covers and how graded coins are handled as a factual exception, not a condition note.
Presale estimates
A slider shifts every newly generated presale estimate up or down by 10% steps, from -50% to +50%, defaulting to 0% (no change). Useful if you find estimates consistently run a bit high or low for your market and you'd rather not correct each one by hand. The adjusted number is still rounded to the same clean auction increments as before ($25 steps above roughly $100, $5 under), never an odd number like $172.50. This only affects estimates generated from here on, it doesn't touch anything already on an existing lot.
Restricted item flagging
On by default. Flags any lot whose title or description mentions something that commonly needs special handling before listing, firearms, alcohol, tobacco, protected wildlife materials, and similar categories, so you can double-check before it goes to HiBid, Proxibid, or wherever else you list. It's a nonintrusive heads-up only, nothing is ever blocked or changed automatically. Turning it off removes every flag instantly without touching any lot's actual content.
Warn me about lot-number gaps
On by default. Pauses an Auto-Detect scan the moment it notices a skipped lot number, so you can fix it before it works through the rest of the pool. Turn it off if you'd rather it never stop and just group everything it finds.
The sticker-position choice (before/after) lives in the "Before You Scan" popup instead, right when you run a scan, see the Auto-Detect Lot Numbers tab.
Help & Feedback
The round button in the bottom-left corner of the app opens a quick help panel, separate from the User Instructions window. It's split into two tabs: Ask a Question and Send Feedback.
Ask a Question
Type a question and it searches the app's own instructions for the closest match, the same content that's in this window, just faster to search for a specific thing. It's a plain keyword search, not a generative chat, so it can only ever answer from what's already written here, nothing is sent anywhere to answer it. A few suggested questions are shown to start you off. If it can't find anything close enough, it says so plainly instead of guessing.
Email Us
Every answer, matched or not, has an Email Us button below it. It opens your own email program with a message already addressed and pre-filled with your question and whatever answer the search found (or a note that it didn't find one), so a real person can pick up from there.
Send Feedback
The other tab is a plain text box for anything else: a bug, an idea, a complaint, a compliment. Click Send and it opens your email program with your message pre-filled, ready to send. There's no search involved on this side, whatever you type goes straight to us.